
Introduction
As summer approaches, the craving for refreshing desserts becomes almost irresistible. When the sun is blazing and temperatures soar, nothing satisfies quite like a cool, light treat that bursts with flavor. Zesty Frozen Lemon Coconut Cream Bars are the perfect solution, harmoniously blending the tartness of fresh lemons with the creamy sweetness of coconut. This delightful dessert not only offers a unique flavor profile but also stands out as a visually appealing treat that can elevate any gathering, from casual backyard barbecues to elegant dinner parties.
The appeal of these frozen bars lies not only in their flavor but also in their simplicity. With minimal prep time and straightforward steps, you can whip up a batch of these bars that will impress family and friends alike. The combination of zesty lemon and rich coconut creates a delightful contrast that leaves a lasting impression. In this article, we will explore the recipe step-by-step, delve into the ingredients that make these bars so special, and offer tips for achieving the perfect texture and flavor.
Understanding the Ingredients
To create the perfect Zesty Frozen Lemon Coconut Cream Bars, it’s essential to understand the role of each ingredient. Each component contributes to the overall taste and texture, ensuring that every bite is as delightful as the last.
Exploring the Crust Components
The crust of the bars is a crucial foundation that supports the creamy filling and adds a contrasting texture. Here are the key ingredients that make up the crust:
– The Role of Graham Cracker Crumbs: Graham cracker crumbs serve as the base of the crust, providing a sweet, slightly nutty flavor that pairs beautifully with the filling. Their crumbly texture helps create a crunchy base that holds together well once chilled. Using store-bought crumbs can save time, but for a fresher taste, consider crushing whole graham crackers in a food processor.
– Sweetened vs. Unsweetened Coconut: What to Use and Why: Coconut is a star ingredient in this recipe, lending its tropical flavor and creamy texture. You can choose between sweetened and unsweetened coconut depending on your preference. Sweetened coconut will add extra sweetness to the bars, while unsweetened coconut allows the natural flavors of lemon and cream to shine through. For a balanced taste, many bakers opt for a mix of both.
– Importance of Unsalted Butter in Dessert Recipes: Unsalted butter is preferred in desserts because it allows for better control over the saltiness of the final product. The creamy richness of the butter not only binds the crust together but also enhances its flavor. If you only have salted butter on hand, you can adjust the added salt in the recipe accordingly to prevent the bars from becoming too salty.
– How Sugar and Salt Enhance Flavor: Sugar serves as a sweetener in the crust, balancing the tartness of the lemon filling. A pinch of salt, meanwhile, enhances the overall flavor profile, bringing out the natural sweetness of the coconut and butter. This combination creates a well-rounded taste that is essential for a successful dessert.
Delving into the Filling Ingredients
The filling of these bars is where the magic happens. It’s essential to choose high-quality ingredients to ensure a delicious result:
– The Unique Qualities of Coconut Cream: Coconut cream is a rich, thick substance extracted from the flesh of mature coconuts. It adds a luxurious creaminess to the filling, making the bars smooth and decadent. Unlike coconut milk, coconut cream has a higher fat content, which helps to create a velvety texture that complements the tartness of the lemon.
– Fresh Lemon Juice vs. Bottled: A Flavor Comparison: Freshly squeezed lemon juice is always preferred over bottled juice for its vibrant flavor and aroma. The brightness and acidity of fresh lemons elevate the overall taste of the bars, providing that zesty punch that makes them so refreshing. When using fresh lemons, ensure that you zest them first to capture the essential oils in the peel, which add an extra layer of flavor.
– The Benefits of Using Honey or Maple Syrup as a Sweetener: While granulated sugar is a common sweetener, using natural alternatives like honey or maple syrup can enhance the flavor profile of the bars. Both options add a unique taste—honey offers floral notes, while maple syrup brings a hint of caramel. Additionally, these natural sweeteners can provide a slight health boost compared to refined sugars.
– Adding Sweetened Condensed Milk: Is It Necessary?: Sweetened condensed milk is often included in recipes for creamy desserts due to its rich texture and sweetness. In this recipe, it serves to create a smooth filling that sets well in the freezer. However, if you prefer a less sweet option or want to avoid sweetened condensed milk, you can substitute it with a mixture of coconut cream and a sweetener of your choice, adjusting to taste.
Topping It Off
To elevate your Zesty Frozen Lemon Coconut Cream Bars, consider adding a few finishing touches:
– The Benefits of Toasting Coconut: Toasting shredded coconut before adding it as a topping can enhance its flavor significantly. The toasting process brings out its natural nuttiness and adds a delightful crunch, creating a more complex flavor experience. Just be sure to keep an eye on the coconut while it toasts, as it can go from perfectly golden to burnt in a matter of minutes.
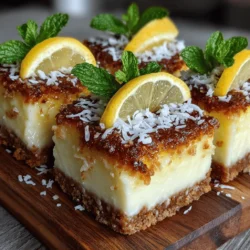
– Garnishing with Lemon Slices and Mint: Enhancing Visual Appeal and Flavor: A garnish of fresh lemon slices and mint leaves not only adds visual appeal but also complements the zesty flavors of the bars. The lemon slices can be arranged artfully on top or served on the side, while mint adds a refreshing note that balances the creamy richness of the dessert.
Step-by-Step Recipe Instructions
Now that we’ve explored the ingredients and their roles in creating these delightful bars, let’s dive into the step-by-step instructions for preparing them.
Preparing the Crust
1. Preheating the Oven: Why Temperature Matters: Begin by preheating your oven to 350°F (175°C). This ensures that the crust bakes evenly, resulting in a firm and crunchy base. An adequately preheated oven will help achieve the desired texture without overcooking the crust.
2. Mixing the Crust Ingredients: Achieving the Right Consistency: In a mixing bowl, combine the graham cracker crumbs, shredded coconut, sugar, and melted unsalted butter. Use a fork or a pastry cutter to mix the ingredients until they resemble wet sand. The mixture should hold together when squeezed in your hand, indicating that it’s ready to be pressed into the baking dish.
3. Pressing the Crust into the Baking Dish: Tips for Evenness: Line a square baking dish with parchment paper for easy removal later. Pour the crust mixture into the dish and use the back of a measuring cup or your fingers to press it down firmly and evenly across the bottom. Make sure to pack it tightly to avoid crumbling when you cut the bars later. Once the crust is evenly distributed, place it in the preheated oven and bake for about 10 minutes, or until lightly golden and fragrant. Allow it to cool completely before adding the filling.
With these foundational elements in place, you’re well on your way to creating a batch of Zesty Frozen Lemon Coconut Cream Bars that will delight your taste buds and impress your guests. Stay tuned for the subsequent steps to complete this refreshing dessert!
{{image_2}}
Baking the Crust: Indicators of Doneness
Creating the perfect crust is essential for your Zesty Frozen Lemon Coconut Cream Bars. Start by preheating your oven to 350°F (175°C). Once your crust mixture is evenly pressed into the bottom of your baking dish, it’s time to bake. Bake for about 10-12 minutes, or until the edges begin to turn a light golden brown. This is a crucial step; underbaking can lead to a soggy crust, while overbaking might cause it to become too hard.
To check for doneness, look for these indicators:
– Color: The edges should be slightly golden, while the center remains pale.
– Texture: Gently press the center with a spatula; it should feel firm but not overly hard.
– Aroma: A toasty scent will fill the kitchen, indicating that your crust is nearing perfection.
Once baked, remove the crust from the oven and allow it to cool completely before adding the filling. This step is essential as a warm crust can cause the filling to melt and not set properly.
Crafting the Filling
The filling for these bars is where the magic happens. A smooth, creamy filling is vital for that refreshing experience. Here’s how to achieve the best results.
Combining Ingredients: Best Practices for a Smooth Texture
To ensure your filling is silky and luscious, start by gathering all the ingredients: coconut cream, fresh lemon juice, lemon zest, sugar, and eggs (or sweetened condensed milk if you opt for a shortcut). For the best texture, use full-fat coconut cream, as it provides the richness needed for this dessert.
1. Room Temperature Ingredients: Allow eggs and coconut cream to come to room temperature before mixing. This helps them blend more easily, preventing clumps.
2. Sifting Dry Ingredients: If you’re using granulated sugar, consider sifting it to remove any lumps. This step ensures an even distribution throughout the filling.
Whisking Techniques for Optimal Mixing
The key to a smooth filling lies in effective whisking. Start by whisking the coconut cream in a large mixing bowl until it’s fluffy. Then, add in the lemon juice and lemon zest, followed by your choice of sweetener.
– Using an Electric Mixer: For the best results, use an electric mixer on medium speed. This method will incorporate air and create a light texture.
– Hand Whisking: If you prefer a hands-on approach, a sturdy whisk can do the job; just ensure you whisk vigorously to prevent any lumps.
Optional Ingredients: How Sweetened Condensed Milk Changes the Game
If you want to simplify the filling process, consider using sweetened condensed milk. This ingredient not only adds sweetness but also contributes to a creamier consistency. If you choose this route, reduce the sugar in your recipe since the condensed milk is already sweet.
When using sweetened condensed milk, combine it with lemon juice and zest in a bowl first, then gradually fold in the coconut cream. This adjustment allows for a smoother blend and ensures the flavors marry beautifully.
Assembling the Bars
With your crust cooled and filling ready, it’s time to assemble your bars.
Pouring the Filling: Techniques for Even Spreading
Pour the filling mixture over the cooled crust, ensuring even coverage. To achieve a smooth surface:
– Use a Rubber Spatula: This tool is perfect for spreading the mixture evenly. Start from the center and push the filling towards the edges.
– Tapping Method: Gently tap the baking dish on the countertop; this helps settle the filling and reduce air bubbles, leading to a more uniform texture.
Freezing the Bars: Timing and Temperature Considerations
After spreading the filling, cover the baking dish with plastic wrap or aluminum foil, ensuring it’s airtight. Place the dish in the freezer and allow it to set for at least 4-6 hours. For best results, overnight freezing is recommended to ensure that the bars are solid and easy to cut.
Serving Suggestions
Once the bars are frozen and ready to serve, it’s time to present them beautifully.
Safely Lifting the Bars from the Pan
To remove the bars from the pan without breaking, run a sharp knife along the edges to loosen them. If you’ve used parchment paper to line the baking dish, simply lift the bars out using the overhanging paper, making the process easy and mess-free.
Cutting Techniques for Neat and Even Bars
For the cleanest cuts, use a sharp, warm knife. Dip the knife in hot water, wipe it dry, and then slice through the bars. This technique prevents sticking and ensures that each piece retains its shape. Aim for uniform squares or rectangles, approximately 2×2 inches, for a visually appealing presentation.
Ideal Garnishes: Toasted Coconut, Lemon, and Mint
Presentation matters, and garnishing your bars can elevate their appeal. Consider these options:
– Toasted Coconut: Sprinkle toasted coconut flakes on top for added texture and flavor.
– Lemon Zest: A sprinkle of fresh lemon zest enhances the vibrant flavor and adds a pop of color.
– Mint Leaves: Fresh mint leaves provide a refreshing touch and a beautiful contrast against the creamy bars.
Storing Your Frozen Lemon Coconut Cream Bars
To keep these delicious bars fresh and ready to enjoy, proper storage is essential.
Best Practices for Freezing
When storing your bars, ensure they are completely frozen before transferring. This prevents them from sticking together. Use an airtight container or a freezer-safe bag to keep them well protected.
How to Store Leftover Bars: Airtight Containers vs. Freezer Bags
Both airtight containers and freezer bags have their benefits. Containers provide more protection against freezer burn, while bags take up less space. Whichever you choose, ensure that the bars are wrapped or stored in a single layer to prevent sticking.
Understanding Shelf Life: How Long Can You Keep Them?
When stored properly, your Zesty Frozen Lemon Coconut Cream Bars can last up to three months in the freezer. Always check for any signs of freezer burn or off-odors before consuming, as maintaining quality is key to enjoying this delightful treat.
Nutritional Benefits of Key Ingredients
These bars not only taste great but also offer some nutritional benefits.
Coconut Cream: A Source of Healthy Fats
Coconut cream is rich in healthy saturated fats known as medium-chain triglycerides (MCTs), which are easier for the body to process. These fats can provide a quick source of energy and may also support metabolic health.
Lemons: Packed with Vitamin C and Antioxidants
Lemons are a powerhouse of Vitamin C, which is essential for a healthy immune system. They also contain antioxidants that help fight free radicals, supporting overall health and wellness.
Graham Crackers: Understanding Their Nutritional Value
While graham crackers are often viewed as a sweet treat, they provide some fiber and are less processed than many other dessert bases. When choosing graham crackers, opt for whole grain varieties to maximize fiber intake.
Conclusion
Zesty Frozen Lemon Coconut Cream Bars are not just a treat; they are a celebration of flavors that encapsulate the essence of summer. With their refreshing lemony taste and creamy coconut texture, they are sure to be a hit at gatherings or as a personal indulgence. With this detailed guide, you are equipped to create these delightful bars in your own kitchen, ensuring a satisfying and delicious experience that will leave everyone wanting more. Enjoy the process, and savor every bite of your homemade creation!