Introduction to Divine No-Bake Biscoff Cheesecake Jars
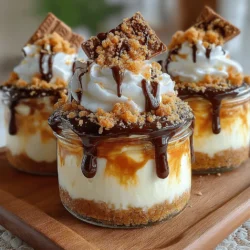
Indulging in a dessert that combines rich flavors and delightful textures is one of life’s simple pleasures. If you’re looking for a dessert that embodies this sentiment, look no further than the Divine No-Bake Biscoff Cheesecake Jars. These jars offer a luxurious treat that is as visually appealing as it is delicious. With a creamy, rich cheesecake filling layered over a buttery Biscoff cookie crust, this no-bake delight is topped off with crunchy Biscoff cookies, making it an irresistible finish to any meal or gathering.
The allure of this dessert lies not only in its taste but also in its simplicity. No-bake cheesecake recipes are perfect for those who wish to enjoy a decadent dessert without the hassle of baking. This recipe is particularly beginner-friendly, allowing anyone to create a gourmet dessert experience right in their own kitchen. Whether you’re hosting a dinner party, celebrating a special occasion, or simply treating yourself to something special, these Biscoff cheesecake jars are sure to impress.
In this article, we will guide you through the steps to create this delicious dessert, exploring the essential ingredients, preparation methods, and serving ideas to elevate your dessert game. You will learn how to assemble each component to create a stunning presentation that will delight both the eyes and the palate.
Understanding the Essential Ingredients
Biscoff Cookie Crumbs: The Foundation of Flavor
At the heart of this delightful dessert is the Biscoff cookie. These cookies, known for their unique caramelized flavor and crisp texture, serve as the foundation for the cheesecake crust. Originating from Belgium, Biscoff cookies are spiced with cinnamon and have a hint of sweetness that perfectly complements the rich and creamy cheesecake filling.
To create the cookie crust, Biscoff cookies are crushed into fine crumbs. This step is crucial, as the crumbs provide both flavor and texture. You can achieve the perfect crumb consistency by using a food processor, which allows for quick and even crushing. If you don’t have a food processor, you can place the cookies in a zip-top bag and crush them using a rolling pin. Aim for a fine crumb that can easily bind with melted butter, creating a sturdy base for your cheesecake.
Cream Cheese: The Creamy Base of the Cheesecake
Cream cheese is the star of any cheesecake recipe, providing a rich and creamy texture that is essential for a successful dessert. For the best results, opt for full-fat cream cheese, which yields a denser and creamier filling. While light cream cheese can be used, it may result in a filling that lacks the desired richness and flavor.
Before using, allow the cream cheese to come to room temperature. This ensures that it blends smoothly with the other ingredients, preventing any lumps in your cheesecake filling. A smooth, creamy mixture is vital for achieving that luxurious texture that makes no-bake cheesecakes so beloved.
Heavy Whipping Cream: Adding Lightness and Volume
To create a light and airy texture in your cheesecake filling, heavy whipping cream is a key ingredient. When whipped to medium peaks, it not only adds volume but also introduces a delightful creaminess that balances the richness of the cream cheese. The whipped cream lightens the overall texture of the cheesecake, making each bite feel indulgent yet not overly heavy.
To whip the cream effectively, begin by chilling your mixing bowl and beaters in the refrigerator for about 10 minutes. This helps the cream whip faster and achieve better volume. Start whipping at a low speed, gradually increasing to medium-high until soft peaks form. Be careful not to over-whip, as this can lead to a grainy texture.
Biscoff Spread: The Star Ingredient
No Biscoff cheesecake is complete without the addition of Biscoff spread. This creamy spread is made from crushed Biscoff cookies and adds a luscious, caramel-like flavor that enhances the overall taste of the cheesecake. The spread can be swirled into the cheesecake filling for added flavor or used as a topping, providing an extra layer of indulgence.
If you cannot find Biscoff spread, there are alternatives you can consider, such as speculoos spread or even a similar cookie butter product. While these alternatives may vary slightly in flavor, they can still provide that signature caramelized taste that complements the cheesecake beautifully.
Step-by-Step Instructions for the No-Bake Biscoff Cheesecake Jars
Preparing the Cookie Crust
Creating the perfect cookie crust is the first step in assembling your Divine No-Bake Biscoff Cheesecake Jars. Start by gathering your Biscoff cookies and melted butter. For a standard serving size of four jars, you will typically need about 20-25 Biscoff cookies and 4 tablespoons of melted butter.
1. Crush the Cookies: In a food processor, pulse the Biscoff cookies until they turn into fine crumbs. Alternatively, place the cookies in a zip-top bag and crush them with a rolling pin until you achieve a fine consistency.
2. Combine with Butter: In a mixing bowl, combine the crushed cookie crumbs with the melted butter. Stir until the crumbs are evenly coated and the mixture resembles wet sand.
3. Distribute into Jars: Take your jars and evenly distribute the cookie crust mixture among them. Using the back of a spoon or your fingers, press the mixture firmly into the bottom of each jar. This step is crucial for creating a sturdy base that will hold up when you add the cheesecake filling.
4. Chill the Crust: Once the crust is firmly pressed into the jars, place them in the refrigerator for about 10-15 minutes to allow the butter to set and the crust to firm up. This chilling process will help the crust maintain its shape once the filling is added.
This preparation sets the stage for the rich, creamy cheesecake filling that will be layered on top, making every bite of the Divine No-Bake Biscoff Cheesecake Jars an experience to savor. Follow along as we delve deeper into the cheesecake filling and the finishing touches in the next part of this guide.
{{image_2}}
Crafting the Creamy Cheesecake Filling
Creating the creamy filling for your No-Bake Biscoff Cheesecake Jars is a straightforward process that results in a luscious, smooth mixture. Start by ensuring that your cream cheese is at room temperature; this will make it easier to beat and prevent any lumps in your filling.
Instructions for Beating Cream Cheese and Integrating Sugar and Vanilla
1. Prepare Your Ingredients: Gather 16 ounces of cream cheese, 1 cup of powdered sugar, and 1 teaspoon of vanilla extract. It’s essential to use softened cream cheese for the best results.
2. Mixing the Cream Cheese: In a large mixing bowl, use an electric mixer to beat the cream cheese. Start at a low speed and gradually increase to medium, mixing until it becomes creamy and smooth. This process typically takes about 2-3 minutes.
3. Adding Sugar and Vanilla: Once the cream cheese is smooth, add the powdered sugar and vanilla extract. Continue to mix on medium speed until everything is well combined and there are no lumps remaining, which should take another minute or so.
Tips for Achieving a Smooth Mixture Without Lumps
– Room Temperature Ingredients: Always ensure your cream cheese is at room temperature before mixing. Cold cream cheese is more likely to remain lumpy.
– Sift the Sugar: If you find clumps in your powdered sugar, consider sifting it before adding to the cream cheese. This helps ensure a seamless blend.
– Scrape the Bowl: Don’t forget to periodically scrape down the sides of the bowl with a spatula to ensure all ingredients are thoroughly mixed.
Whipping the Heavy Cream
The heavy cream is what will give your cheesecake its light and fluffy texture, making it even more irresistible.
Guide to Whipping Cream Correctly and Maintaining Its Texture
1. Chill Your Equipment: For the best results, chill your mixing bowl and beaters in the refrigerator for about 15 minutes before whipping the cream. This helps the cream whip faster and reach the desired peaks.
2. Start Whipping: Pour 1 cup of heavy whipping cream into the chilled bowl. Begin beating on medium speed, then increase to high speed as the cream begins to thicken.
3. Check for Stiff Peaks: Continue whipping until the cream reaches stiff peaks, which means it should hold its shape when you lift the beaters out. This usually takes about 3-5 minutes.
Importance of Gentle Folding Techniques to Combine with Cream Cheese
Once your heavy cream is whipped, it’s vital to combine it with the cream cheese mixture using a gentle folding technique to maintain its airy texture.
– Folding Method: Use a spatula to scoop under the cream cheese mixture and gently fold it over the whipped cream. Rotate the bowl as you fold, and repeat until no white streaks remain. Be careful not to over-mix, as this can deflate the whipped cream.
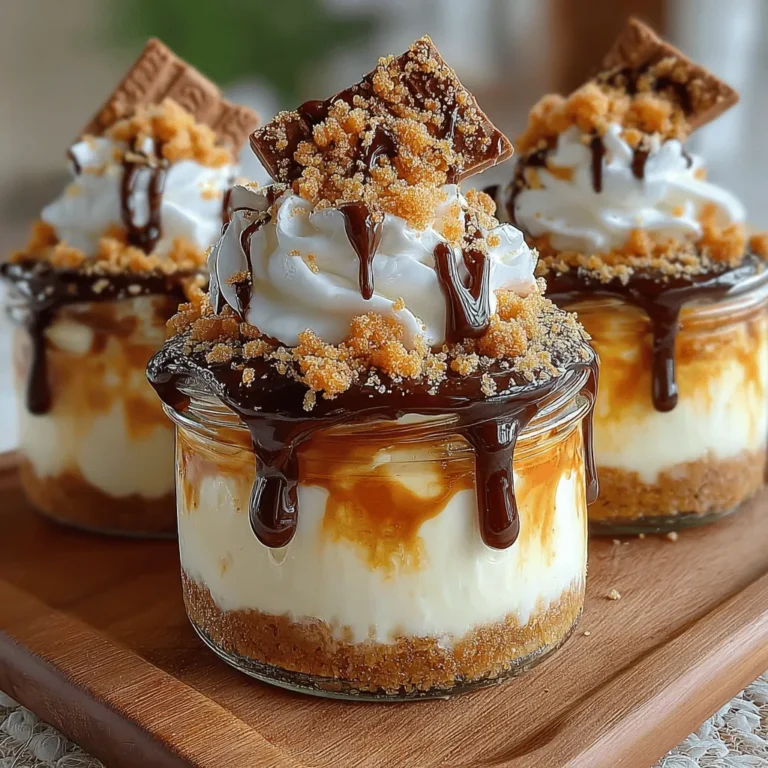
Layering the Cheesecake for Visual Appeal
Layering your cheesecake mixture in the jars is where the fun begins! Not only does it contribute to the aesthetic appeal, but it also enhances the flavor profile with delicious Biscoff spread.
Suggestions for Layering Techniques, Including the Use of Biscoff Spread
1. Start with the Base: Begin by spooning a layer of the crushed Biscoff cookie mixture into the bottom of your jars. This forms a crunchy base that complements the creamy filling.
2. Add the Cheesecake Filling: Next, use a piping bag or a spoon to layer the cheesecake filling over the cookie base. Fill the jars about halfway.
3. Incorporate Biscoff Spread: To add an extra layer of flavor, take a few tablespoons of Biscoff spread and gently spoon it on top of the cheesecake layer. You can slightly swirl it with a knife or toothpick for a marbled effect.
4. Repeat the Layers: Continue layering with more cookie crumbs, cheesecake filling, and Biscoff spread until the jars are filled to the top, finishing with a layer of cheesecake filling.
Ideas for Creating Visually Appealing Swirls and Layers
– Color Contrast: Use the contrasting colors of the Biscoff spread and the cheesecake filling to create appealing layers. This visual contrast makes the jars more inviting.
– Use a Piping Bag: For a neat and professional look, consider using a piping bag to add the cheesecake filling. This technique allows for precise layering and creates beautiful swirls.
Chilling for the Perfect Set
After assembling your jars, the chilling process is crucial in achieving the perfect texture for your No-Bake Biscoff Cheesecake.
Explanation of the Chilling Process and Its Importance
Chilling allows the flavors to meld together and the cheesecake to set properly. Without enough chilling time, your cheesecake may not hold its shape when served.
Recommended Chilling Times for Best Results
– Minimum Chill Time: Ideally, you should chill the cheesecake jars for at least 4 hours. This allows the cream to firm up and the flavors to develop.
– Overnight Option: For the best results, consider chilling your jars overnight. This extended time will ensure a firmer texture and enhance the overall flavor.
Serving Suggestions for Maximum Enjoyment
Now that your No-Bake Biscoff Cheesecake Jars are perfectly set, it’s time to think about serving and enjoying them.
Garnishing Your Dessert
1. Crushed Biscoff Cookies: Top each cheesecake jar with a sprinkle of crushed Biscoff cookies for added crunch and a decorative touch.
2. Chocolate or Caramel Drizzle: For an extra indulgent treat, consider drizzling warm chocolate sauce or caramel over the top just before serving. This adds a rich flavor that complements the cheesecake beautifully.
Presentation Tips for Serving
– Elegant Display: Arrange the jars on a decorative platter for a stunning presentation at gatherings or parties. You can also use a variety of jar sizes for visual interest.
– Creative Packaging: If you plan to give these jars as gifts or party favors, consider wrapping them in cellophane and tying them with a ribbon. This adds a personal touch and makes them look even more delightful.
Conclusion: The Joy of No-Bake Desserts
The Divine No-Bake Biscoff Cheesecake Jars represent a delightful blend of flavors and textures that will impress your family and friends. This easy-to-follow recipe not only allows you to create a stunning dessert but also provides a chance to explore your creativity in the kitchen. Whether you are serving it at a gathering or enjoying it as a personal treat, these jars are sure to become a favorite.
Embrace the joy of no-bake desserts and savor each delicious spoonful of this heavenly cheesecake. The combination of creamy cheesecake, crunchy Biscoff cookies, and rich spread makes for a truly divine experience that is sure to please any palate. Enjoy your culinary creation and share the love with those around you!