
Decadent No-Bake Peanut Butter Cups Recipe
Introduction
In the world of desserts, no-bake recipes have carved a niche that appeals to both novice and seasoned bakers alike. These delightful treats are celebrated for their convenience and the ability to deliver indulgent flavors without the need for an oven. Among these, the decadent no-bake peanut butter cups stand out as a quintessential favorite. Combining the creamy richness of peanut butter with the velvety smoothness of chocolate, these treats promise an experience that is both satisfying and simple to prepare.
The allure of no-bake peanut butter cups lies not only in their rich taste but also in the harmonious balance of flavors. The creamy peanut butter filling, infused with just the right amount of sweetness, is encased in a layer of luscious chocolate that melts in your mouth. Complementing this divine combination is the subtle crunch of graham cracker crumbs, which adds a delightful texture that elevates these cups from ordinary to extraordinary.
Understanding the Appeal of No-Bake Desserts
In today’s fast-paced world, convenience is key. No-bake desserts provide a wonderful solution for those who find themselves pressed for time but still crave a sweet treat. They require minimal ingredients and eliminate the lengthy process of preheating an oven, making them perfect for busy lifestyles. Furthermore, quick preparation means you can whip up a batch of these peanut butter cups in no time, allowing you to enjoy a delicious dessert without the fuss.
Another significant advantage of no-bake recipes is their appeal during warm weather months. When the temperatures rise, the last thing many want to do is turn on the oven and heat up the kitchen. No-bake desserts offer a refreshing alternative that doesn’t compromise on flavor or satisfaction. Whether it’s a summer gathering or a cozy movie night, these peanut butter cups are an ideal choice that will impress friends and family alike.
Ingredient Insights
To create the perfect decadent no-bake peanut butter cups, a thoughtful selection of ingredients is vital. Each component plays a crucial role in achieving the desired flavor and texture, ensuring a delicious end product.
Creamy Natural Peanut Butter: The star of this recipe, creamy natural peanut butter, brings not only a rich, nutty flavor but also a host of nutritional benefits. Packed with protein, healthy fats, and essential vitamins, it provides a satisfying element that keeps you coming back for more.
Powdered Sugar: This ingredient is essential for achieving the perfect texture and sweetness in your peanut butter mixture. Unlike granulated sugar, powdered sugar dissolves easily, contributing to a smooth consistency that complements the creamy peanut butter.
Pure Vanilla Extract: A splash of pure vanilla extract enhances the flavor complexity of the peanut butter filling. It adds a subtle warmth that balances the richness of the peanut butter, making each bite more enjoyable.
Graham Cracker Crumbs: These crumbs serve as a delightful addition to the mixture, providing a crunchy texture that contrasts beautifully with the creamy filling. They also help to bind the ingredients together, creating a dough-like consistency that holds its shape when formed into cups.
Dark Chocolate Chips vs. Milk Chocolate: The choice between dark and milk chocolate can significantly influence the flavor profile of your peanut butter cups. Dark chocolate offers a more intense, slightly bitter taste that pairs well with the sweetness of peanut butter, while milk chocolate provides a creamier, sweeter option. Health-conscious bakers may prefer dark chocolate for its higher cocoa content and lower sugar levels.
Coconut Oil: This ingredient acts as a healthier fat alternative to traditional butter. It helps to create a smooth chocolate layer while adding a hint of tropical flavor. If you prefer, you can also use unsalted butter, but be mindful of the added richness it brings to the dessert.
Step-by-Step Instructions
Now that we’ve covered the essential ingredients, let’s delve into the process of preparing these delectable no-bake peanut butter cups. The key to achieving the perfect texture and flavor lies in the careful execution of each step.
Preparing the Peanut Butter Mixture:
1. Start by gathering your ingredients: creamy natural peanut butter, powdered sugar, pure vanilla extract, and graham cracker crumbs.
2. In a mixing bowl, combine the creamy peanut butter with the powdered sugar and vanilla extract. Using a spatula or a hand mixer, blend the ingredients until they are thoroughly combined. The mixture should be smooth and somewhat thick, resembling a dough-like consistency.
3. Gradually mix in the graham cracker crumbs, ensuring that they are evenly distributed throughout the peanut butter mixture. This step is crucial, as the crumbs hold the mixture together while adding that delightful crunch.
Importance of Mixing Techniques: When mixing, it’s important to take your time and ensure that all ingredients are well incorporated. If the mixture feels too sticky, add a touch more graham cracker crumbs until you achieve the desired consistency. Conversely, if it feels too dry, a little more peanut butter can help bring it back together.
Melting the Chocolate:
1. For the chocolate layer, you will need dark chocolate chips or milk chocolate chips, depending on your preference. Place the chips in a microwave-safe bowl.
2. Melt the chocolate using the microwave in short bursts of 20 to 30 seconds, stirring in between. This method prevents overheating and ensures that the chocolate melts smoothly without clumping.
Best Practices for Melting Chocolate Safely: Always keep a close eye on the chocolate as it melts. Once it’s mostly melted but still has some small chunks, remove it from the microwave and stir until completely smooth. This technique helps to avoid burning the chocolate, which can ruin the flavor and texture.
By following these initial steps, you are well on your way to creating decadent no-bake peanut butter cups that will delight your taste buds and impress your guests. Whether enjoyed as a quick treat or a centerpiece for a special occasion, these cups are sure to become a beloved addition to your dessert repertoire. Stay tuned for the next part of the article, where we will explore the final steps to assemble and set these delightful treats.
{{image_2}}
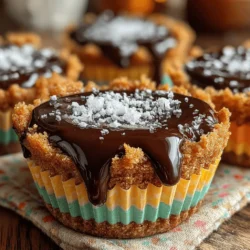
Importance of Consistency in the Chocolate for Layering
When it comes to creating the perfect no-bake peanut butter cups, the consistency of your chocolate is crucial. Aim for a smooth, melted chocolate that can easily coat the muffin cups without clumping. Using high-quality chocolate chips or bars will ensure a rich flavor and a glossy finish. To achieve this, melt the chocolate slowly using a double boiler or in short bursts in the microwave, stirring frequently to avoid overheating. The goal is a velvety texture that will not only look appealing but will also provide that satisfying snap when you take a bite.
Assembling the Cups
Techniques for Lining the Muffin Tin for Easy Removal
Properly lining your muffin tin is essential to ensure easy removal of your peanut butter cups. Start by using paper cupcake liners—these are a great option as they provide a barrier between the chocolate and the tin, allowing for effortless extraction once the cups are set. If you prefer a more eco-friendly approach, you can also use silicone muffin molds, which naturally help in releasing the cups without sticking. Whichever method you choose, be sure to lightly grease the liners with a cooking spray or a small amount of coconut oil to further prevent sticking.
Importance of Layering: Chocolate Base, Peanut Butter Filling, and Topping
Layering is the secret to achieving the perfect texture and flavor balance in your no-bake peanut butter cups. Start by pouring a small amount of melted chocolate into the bottom of each lined muffin cup, just enough to cover the base. Allow this layer to set slightly in the refrigerator before adding the creamy peanut butter filling, which is made from a blend of peanut butter, powdered sugar, and a pinch of salt for flavor enhancement. Once the filling is in place, add another layer of chocolate to seal the filling in, ensuring that each cup is completely covered. This method not only creates a visually appealing treat but also guarantees that each bite is a harmonious blend of chocolate and peanut butter.
Finalizing the No-Bake Cups
Setting Times for Optimal Texture
Once you have assembled your no-bake peanut butter cups, it’s time to let them set. Place the muffin tin in the refrigerator for at least 30 minutes to an hour. This chilling time is essential for the chocolate to harden properly and for the layers to meld together. If you’re in a hurry, you can also place them in the freezer for about 15-20 minutes, but keep an eye on them to prevent the chocolate from becoming too hard.
Importance of Patience in Allowing Layers to Harden
Patience is key when making no-bake desserts. Allowing each layer of chocolate and peanut butter to harden sufficiently is crucial for achieving the right texture. If you rush this process, you may end up with a gooey mess when you try to remove the cups from the muffin tin. Giving the layers ample time to set not only enhances the flavor but also contributes to a more satisfying crunch when you take a bite.
Serving Suggestions and Pairings
Presentation Ideas for Serving Peanut Butter Cups
When it comes to serving your decadent no-bake peanut butter cups, presentation matters. Consider arranging them on a decorative platter or cake stand for an inviting display. You can also dust the tops with cocoa powder, powdered sugar, or even a sprinkle of sea salt for an added touch of elegance. For an extra indulgent experience, serve them alongside a scoop of vanilla ice cream or a dollop of whipped cream.
Suggestions for Complementary Beverages
Pair your peanut butter cups with beverages that complement their rich flavors. A cup of freshly brewed coffee or espresso works beautifully, enhancing the chocolate notes in the dessert. For a lighter option, a glass of cold milk is a classic choice, especially for those who enjoy the nostalgic combination of peanut butter and milk. Additionally, smoothies made with bananas and almond milk can provide a delightful contrast to the richness of the cups.
Ideas for Variations
Don’t hesitate to get creative with your no-bake peanut butter cups. You can add crushed nuts, such as almonds or walnuts, to the peanut butter filling for added texture and flavor. A sprinkle of sea salt on top can amplify the sweetness and balance the flavors beautifully. If you’re feeling adventurous, consider incorporating different types of chocolate—dark chocolate or white chocolate can bring new dimensions to your treats.
Storing and Shelf Life
Best Practices for Storing No-Bake Peanut Butter Cups
To ensure your no-bake peanut butter cups remain fresh and delicious, store them in an airtight container in the refrigerator. This will maintain their texture and prevent them from absorbing any odors from other foods. If you’ve made a large batch, consider separating layers with parchment paper to avoid them sticking together.
Discussion on Shelf Life and Freshness Indicators
When stored properly, no-bake peanut butter cups can last up to two weeks in the refrigerator. If you notice any changes in texture, such as a dry or crumbly exterior, or if there is an unusual smell, it’s best to discard them. Always trust your senses—if something doesn’t seem right, it’s better to err on the side of caution.
Ideal Serving Temperature for the Best Taste Experience
For optimal taste and texture, serve your peanut butter cups slightly chilled. This allows the chocolate to have a nice snap while the peanut butter filling remains creamy. Allow them to sit at room temperature for about 10-15 minutes before serving if you prefer a softer texture.
Nutritional Breakdown
Overview of Nutritional Aspects of the Recipe
These no-bake peanut butter cups are not only indulgent but can also be a fairly nutritious treat when made with wholesome ingredients. Made primarily from peanut butter, dark chocolate, and a touch of powdered sugar, they provide a source of healthy fats and protein.
Caloric Content per Serving
Each peanut butter cup contains approximately 100-120 calories, depending on the size and the specific ingredients used. This makes them an ideal sweet treat without overindulging. However, be mindful of portion sizes, especially if you’re enjoying them as a dessert after a meal.
Key Vitamins and Minerals from the Ingredients
Peanut butter is rich in protein, healthy fats, vitamin E, and magnesium. Dark chocolate contains antioxidants and can contribute to heart health. By choosing high-quality ingredients, you can create a more nutritious dessert option that satisfies your sweet tooth while providing some health benefits.
Considerations for Dietary Restrictions
This recipe can easily be adapted for those with dietary restrictions. For gluten-free options, ensure that the chocolate and any added ingredients are certified gluten-free. Additionally, you can use natural sweeteners or sugar alternatives for those watching their sugar intake. Vegan options can be achieved by using dairy-free chocolate and natural nut butters that contain no added ingredients.
Conclusion
Making decadent no-bake peanut butter cups is a simple yet rewarding experience that brings joy to any gathering or serves as a personal treat. The ease of assembly and the indulgent flavors make this recipe a must-try for any dessert lover. Whether you’re preparing for a celebration or simply satisfying your sweet cravings, these homemade treats are sure to impress.
So why not give this recipe a shot? Enjoy the process of creating your own delicious peanut butter cups, and revel in the satisfaction that comes from making homemade desserts. There’s nothing quite like indulging in a treat crafted with your own hands, especially when it requires no baking at all.