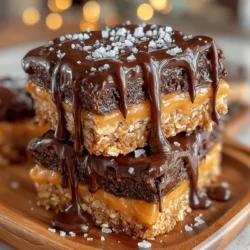

Decadent No-Bake Chocolate Peanut Butter Bars: A Deliciously Easy Treat
No-bake desserts have taken the culinary world by storm, attracting lovers of all things sweet with their ease of preparation and delightful flavors. Among the myriad of no-bake options, one treat stands out for its rich, indulgent flavors: Decadent No-Bake Chocolate Peanut Butter Bars. The combination of creamy peanut butter and luscious chocolate creates a dessert that is not only satisfying but also a crowd-pleaser. Whether you are hosting a gathering or simply looking for a sweet treat to enjoy at home, these bars are sure to impress.
The allure of chocolate and peanut butter is undeniable. This classic pairing has been a favorite for generations, captivating taste buds with its harmonious blend of flavors. The creamy, nutty taste of peanut butter perfectly complements the deep richness of chocolate, creating a dessert experience that feels indulgent yet comforting. Beyond their deliciousness, these bars can also be tailored to fit various dietary preferences, making them an ideal treat for almost anyone. Whether you follow a vegan diet, need gluten-free options, or simply want a healthier dessert, these no-bake bars can accommodate your needs.
Another appealing aspect of this recipe is the simplicity involved in its preparation. With just a handful of ingredients and minimal kitchen equipment, you can whip up these bars in no time. There’s no need for an oven, extensive baking skills, or waiting hours for the flavors to meld. Instead, you can have a batch ready to enjoy in under 30 minutes, making these bars perfect for those spontaneous dessert cravings.
Moreover, the use of natural sweeteners like honey or maple syrup enhances the health benefits of this indulgent treat. Unlike refined sugars, these natural sweeteners provide a touch of sweetness while offering some nutritional advantages. Honey and maple syrup contain antioxidants and essential nutrients, making them a better choice for those looking to indulge without compromising their health goals. The use of wholesome ingredients ensures that you can enjoy these decadent bars without the guilt often associated with traditional desserts.
Understanding the Ingredients
To create the perfect Decadent No-Bake Chocolate Peanut Butter Bars, it’s essential to understand the role each ingredient plays. Here’s a closer look at the key components that make up this delectable treat.
Creamy Peanut Butter
At the heart of this recipe is creamy peanut butter, which serves as the primary ingredient. Not only does it provide a rich, nutty flavor, but it also offers a host of nutritional benefits. Peanut butter is an excellent source of protein, healthy fats, and essential vitamins and minerals, making it a staple in many kitchens. When choosing peanut butter for this recipe, you can opt for either smooth or chunky varieties. Smooth peanut butter lends a velvety texture to the bars, while chunky peanut butter adds delightful bits of crunch, enhancing the overall eating experience.
Honey or Maple Syrup
Next, we have natural sweeteners—either honey or maple syrup. Both of these options bring their own unique flavors and health benefits to the table. Honey is known for its antibacterial properties and is rich in antioxidants, while maple syrup contains essential minerals like manganese and zinc. When it comes to taste, honey offers a floral sweetness, while maple syrup provides a more robust, caramel-like flavor. The choice between the two can affect the overall texture and sweetness of your bars, so feel free to experiment and find your favorite.
Rolled Oats
Rolled oats are another key ingredient in these no-bake bars, acting as a binding agent and contributing to their chewy texture. Packed with fiber, rolled oats are not only healthy but also keep you feeling full longer. They are a great source of complex carbohydrates, which provide sustained energy. If you need to make these bars gluten-free, be sure to select certified gluten-free oats, as cross-contamination can occur during processing.
Unsweetened Cocoa Powder
To achieve that rich chocolate flavor, unsweetened cocoa powder is essential. Cocoa powder is not only delicious but also packed with health benefits. It is loaded with antioxidants and has been linked to improved heart health and mood enhancement. When selecting cocoa powder, look for high-quality options that are labeled as unsweetened, as these will provide the best flavor without added sugars.
Vanilla Extract and Salt
Don’t underestimate the power of vanilla extract and salt in this recipe. Vanilla extract enhances the overall flavor profile, adding depth and warmth to the bars. A dash of salt is equally important; it helps to balance the sweetness of the honey or maple syrup, ensuring that the bars are not overwhelmingly sweet.
Dark Chocolate Chips
No chocolate dessert would be complete without chocolate chips. Dark chocolate chips not only provide that final layer of decadence but also come with their own health perks. Dark chocolate is rich in antioxidants and can improve heart health when consumed in moderation. For those who are dairy-free, many brands offer delicious dairy-free chocolate chips, ensuring that everyone can enjoy this treat.
Coconut Oil
Finally, coconut oil plays a crucial role in this recipe by helping to melt the chocolate and providing a creamy texture. It is also known for its health benefits, including medium-chain triglycerides (MCTs) that can provide a quick source of energy. Plus, its subtle coconut flavor adds an extra layer of richness to the bars.
Step-by-Step Instructions
Now that we’ve covered the ingredients, let’s dive into the initial steps of preparing your Decadent No-Bake Chocolate Peanut Butter Bars.
1. Preparing the Base Mixture: Start by gathering all your ingredients and measuring them out. In a large mixing bowl, combine the creamy peanut butter and your chosen sweetener (honey or maple syrup). Use a spatula to mix them thoroughly until you achieve a smooth and creamy consistency. This step is crucial, as it sets the foundation for the bars.
2. Incorporating the Dry Ingredients: Once your peanut butter and sweetener are well combined, it’s time to add the rolled oats and cocoa powder. Gently fold these dry ingredients into the peanut butter mixture, ensuring that everything is evenly distributed. The oats will help absorb moisture and give the bars their chewy texture, while the cocoa powder will infuse the mixture with rich chocolate flavor.
As you continue to mix, consider your preferences for texture and taste. If you prefer a chunkier bar, feel free to fold in some crushed nuts or chocolate chips at this stage.
Stay tuned for the next steps, where we will guide you through the final assembly and chilling process to create the ultimate no-bake chocolate peanut butter bars!
{{image_2}}
Tips for Achieving the Perfect Consistency
Creating the perfect no-bake chocolate peanut butter bars requires attention to detail, especially when it comes to the consistency of your mixture. Here are some essential tips to ensure your bars turn out just right:
Incorporating Dry Ingredients
When adding dry ingredients such as oats, cocoa powder, or powdered sugar, it’s crucial to do so gradually. Start by sifting them together to prevent clumping, then add them to your wet mixture in small increments. This technique will ensure that all your ingredients blend uniformly, avoiding any dry pockets in your bars.
Importance of Mixing Techniques for Uniformity
Mixing is vital in achieving a smooth texture. Use a sturdy spatula or a wooden spoon to fold the ingredients gently but thoroughly. Avoid vigorous stirring, which can lead to air pockets and uneven consistency. If you have a stand mixer, use it on a low setting to combine the ingredients without over-mixing.
What to Look for in the Mixture’s Texture
The mixture should be thick but moldable, similar to cookie dough. It should hold together when pressed but not be overly sticky. If it feels too dry, add a splash of almond milk or a bit more peanut butter. Conversely, if it’s too wet, incorporate a little more oats or powdered sugar until you achieve the desired consistency.
Pressing into the Pan
Once your mixture is well combined, it’s time to press it into the pan. This step is crucial for creating a solid base for your chocolate peanut butter bars.
Importance of Using Parchment Paper for Easy Removal
Lining your pan with parchment paper not only helps prevent sticking but also makes it much easier to lift the bars out once they’re set. Cut a piece of parchment paper large enough to hang over the edges of the pan, allowing you to pull the bars out easily.
Techniques for Evenly Pressing the Mixture into the Pan
To achieve an even layer, use a flat-bottomed tool, like a measuring cup or the back of a spatula, to press the mixture firmly into the corners and edges of the pan. Make sure the mixture is compact; this will help the bars hold their shape once chilled. If you notice any air pockets, gently press those areas to eliminate them.
Melting the Chocolate Topping
A smooth, glossy chocolate topping is the crowning glory of your no-bake bars. Here’s how to achieve that perfect melt.
Guidelines for Melting Chocolate to Avoid Burning
To melt chocolate, you can use either a microwave or a double boiler. If using a microwave, place your chocolate in a microwave-safe bowl and heat in 30-second intervals, stirring in between, until completely melted. This method prevents overheating, which can cause the chocolate to seize. If you prefer the double boiler method, place a bowl over a pot of simmering water, ensuring the bowl doesn’t touch the water, and stir until melted.
Importance of Coconut Oil in Achieving a Smooth Consistency
Incorporating coconut oil when melting your chocolate not only adds a delightful hint of flavor but also helps achieve a smooth, pourable consistency. The oil will prevent the chocolate from hardening too quickly on the bars, ensuring a glossy finish.
Topping the Bars
Once your chocolate is melted and smooth, it’s time to pour it over your pressed mixture.
Tips for Spreading Melted Chocolate Evenly
Pour the melted chocolate onto the bars and use an offset spatula or the back of a spoon to spread it evenly across the top. Make sure to reach the edges to create a beautiful finish. If you notice any uneven spots, simply add a bit more chocolate and spread it out until smooth.
Optional Garnishing Ideas for Added Flair
For an extra touch, consider garnishing the melted chocolate with a sprinkle of sea salt, crushed peanuts, or even a drizzle of caramel sauce. These additions not only enhance the presentation but also add layers of flavor and texture.
Chilling Process
Chilling is a crucial step in the preparation of your no-bake chocolate peanut butter bars.
Explanation of Why Chilling is Crucial for Setting the Bars
Chilling your bars allows the chocolate to set and the peanut butter mixture to firm up, ensuring that they hold their shape when cut. This step is essential for achieving the perfect bite-sized treat.
Recommended Chilling Time for Optimal Texture
For optimal results, chill your bars in the refrigerator for at least 2 hours. If you’re short on time, you can place them in the freezer for about 30-45 minutes; however, be cautious not to freeze them completely, as this can alter the texture.
Cutting and Serving
Once your bars are set, it’s time to cut and serve them.
Techniques for Cutting Bars Without Crumbling
To cut your bars without crumbling, use a sharp knife and make clean, even cuts. It’s best to let them sit at room temperature for a few minutes before slicing, as this helps soften the chocolate slightly, making it easier to cut through. Wipe the knife with a paper towel after each cut to maintain clean edges.
Serving Suggestions for Presentation
For an appealing presentation, arrange the bars on a decorative platter and sprinkle with a few crushed peanuts or a light dusting of cocoa powder. These simple touches can make your homemade treat look as good as it tastes.
Nutritional Information
Understanding the nutritional content of your homemade chocolate peanut butter bars can help you make informed choices.
Breakdown of Calories and Nutritional Values per Serving
Each bar contains approximately 200 calories, with a breakdown of 12g of fat, 20g of carbohydrates, and 6g of protein. This makes them a satisfying and indulgent snack without compromising on nutrition.
Comparison of Homemade Versus Store-Bought Options
Homemade bars are often healthier than their store-bought counterparts, which can be laden with preservatives and artificial ingredients. By making your own, you control the quality and quantity of each ingredient, allowing you to indulge without the guilt.
Healthier Alternatives for Specific Dietary Needs
If you’re looking for lower-calorie options, consider using a sugar substitute or almond butter instead of peanut butter. You can also swap out traditional chocolate for dark chocolate to reduce sugar content while still enjoying the rich flavor.
Variations and Customizations
One of the best aspects of this recipe is its versatility. Here are a few suggestions for personalizing your bars.
Suggestions for Adding Nuts, Seeds, or Dried Fruits
Feel free to incorporate chopped nuts like walnuts or almonds for added crunch. You can also add chia seeds or flaxseeds for a nutritional boost. Dried fruits, such as cranberries or raisins, can introduce a sweet-and-tart contrast to the rich chocolate and peanut butter.
Ideas for Flavor Variations
Experimenting with different flavors can lead to delightful variations. Swap peanut butter for almond butter or cashew butter for a unique twist. Adding flavored extracts such as vanilla or coconut can also enhance the overall taste.
Tips for Making the Bars Gluten-Free, Vegan, or Nut-Free
To cater to dietary restrictions, use certified gluten-free oats and ensure all other ingredients are gluten-free. For a vegan version, replace honey with maple syrup or agave nectar and choose dairy-free chocolate. If you need nut-free bars, substitute the nut butter with sunflower seed butter.
Conclusion
Making decadent no-bake chocolate peanut butter bars is a rewarding and straightforward process that results in a delicious treat everyone will love. With their rich flavors and satisfying texture, these bars are perfect for indulgent snacking, dessert, or even as thoughtful homemade gifts.
We encourage you to experiment with your own variations, whether by adding different nuts, seeds, or flavors to make the recipe your own. The joy of indulging in a homemade treat that aligns with healthier eating habits is unmatched.
These no-bake chocolate peanut butter bars are not just a snack; they can be served at parties, packaged as gifts, or enjoyed as a quick pick-me-up throughout the day. Enjoy the process of creating these bars and savor every bite!