
Introduction to Frozen Banana Chocolate Sandwiches
If you’re on the lookout for a delightful dessert that strikes the perfect balance between indulgence and healthiness, look no further than frozen banana chocolate sandwiches. These treats not only satisfy your sweet tooth but also incorporate wholesome ingredients, making them suitable for both children and adults alike. The combination of ripe, naturally sweet bananas, rich chocolate, and creamy nut butter creates a harmonious blend of flavors and textures that is hard to resist.
The beauty of frozen banana chocolate sandwiches lies in their simplicity. With just a handful of ingredients, you can whip up a delicious dessert that is not only easy to prepare but also allows for a variety of adaptations based on your personal tastes. Whether you prefer dark chocolate over milk chocolate, or if you want to add a bit of crunch with granola or nuts, this recipe is incredibly versatile, catering to a range of dietary preferences and cravings.
Understanding the Ingredients
To truly appreciate the frozen banana chocolate sandwiches, it’s essential to understand the key ingredients that bring this recipe to life.
Bananas
At the heart of this recipe are bananas, which are celebrated not only for their delightful sweetness but also for their impressive nutritional profile. Rich in potassium, bananas are great for heart health and help maintain normal blood pressure. They are also a good source of dietary fiber, which aids digestion and promotes a feeling of fullness. The natural sugars in bananas provide a quick energy boost, making them an ideal base for a healthy dessert.
Nut Butter
Complementing the bananas is nut butter, which adds a creamy texture and a dose of healthy fats. Whether you choose classic peanut butter, almond butter, or a sunflower seed spread, nut butters are packed with protein and essential nutrients. They contribute to satiety, making these sandwiches not just a treat, but also a satisfying snack. Look for natural nut butters without added sugars or hydrogenated oils to maximize health benefits.
Chocolate
Next comes the chocolate, a crucial element that elevates these sandwiches from simple to sublime. You can choose between dark and milk chocolate, each offering a different flavor profile and health benefits. Dark chocolate, with its higher cocoa content, is known for its antioxidant properties and has been linked to various health benefits, including improved heart health. Milk chocolate, while sweeter and creamier, offers comfort and nostalgia. Whichever you prefer, chocolate is the star ingredient that ties all the flavors together.
Coconut Oil
Coconut oil plays a vital role in this recipe, especially when it comes to melting chocolate. It helps to create a smooth, glossy coating that clings to the banana sandwiches. Additionally, coconut oil contains medium-chain triglycerides (MCTs), which may offer health benefits such as improved metabolism and energy levels. Its subtle coconut flavor can also enhance the overall taste of the treats.
Sea Salt
A pinch of sea salt may seem like a small addition, but it can make a significant difference in flavor. Salt enhances sweetness and balances out the rich chocolate and nut butter, adding a gourmet touch to these frozen sandwiches. It’s a simple trick that elevates the overall taste profile, making each bite even more satisfying.
Optional Crunch
For those looking to add extra texture and nutrients, consider including optional crunch elements like granola or chopped nuts. These additions not only provide a satisfying crunch but also enhance the overall nutritional value of the sandwiches. Nuts can contribute healthy fats and protein, while granola can add fiber and a hint of sweetness.
Step-by-Step Guide to Making Frozen Banana Chocolate Sandwiches
Now that we’ve covered the essential ingredients, let’s dive into the step-by-step process of creating these delicious frozen banana chocolate sandwiches.
Preparing the Bananas
The first step is preparing your bananas. Choose ripe bananas that are slightly speckled for the best sweetness and flavor. Begin by peeling the bananas and placing them on a cutting board. Using a sharp knife, slice the bananas into even rounds, about half an inch thick. Uniformity is key as it ensures even assembly and a consistent texture in each sandwich. Aim for approximately 20 slices, which will allow you to make ten sandwiches, but feel free to adjust depending on your preference or the number of servings you need.
Spreading the Nut Butter
Once your banana slices are ready, it’s time to spread the nut butter. Take a spoonful of your chosen nut butter and carefully spread it over one side of a banana slice. The amount of nut butter you use can be adjusted to your taste; however, a generous layer about a tablespoon thick typically works well. Make sure to spread it evenly to create a balanced flavor in each bite. Then, take another banana slice and gently press it on top of the nut butter to form a sandwich. Repeat this process until all banana slices are paired with nut butter, ensuring you have an equal number of pairs.
Assembling the Sandwiches
With your banana slices paired, it’s time to assemble the sandwiches. Check that each sandwich has a good layer of nut butter between the two banana slices, as this not only adds flavor but also helps hold the sandwich together when frozen. Arrange the sandwiches on a parchment-lined baking sheet, making sure they are not touching to prevent them from sticking together during freezing. This step is crucial for achieving the perfect texture once they are frozen.
Freezing the Sandwiches
After assembling, place the baking sheet in the freezer. Freezing the sandwiches is an essential step that transforms them from simple banana slices into a creamy, enjoyable treat. Allow the sandwiches to freeze for at least 1-2 hours, or until they are firm. This freezing process not only enhances the texture but also makes them easy to handle when coated in chocolate.
Melting the Chocolate
Now that your banana sandwiches are frozen, it’s time to melt the chocolate. There are various methods to do this, but the stovetop method is often preferred for its reliability and ease.
Stovetop Method
To melt chocolate on the stovetop, start by breaking your chocolate into small, even pieces and placing them in a heatproof bowl. Set up a double boiler by filling a saucepan with a few inches of water and bringing it to a gentle simmer. Place the bowl with the chocolate over the saucepan, ensuring that the bottom of the bowl does not touch the water. Stir the chocolate occasionally as it begins to melt, keeping the heat low to prevent burning. Once the chocolate is smooth and fully melted, remove the bowl from the heat. If using coconut oil, stir it in at this stage to achieve a glossy finish.
With your chocolate melted and ready, you’re now prepared to coat the frozen banana sandwiches, taking your treats to the next level of decadence. The next steps will guide you through the final assembly and coating process, ensuring your frozen banana chocolate sandwiches are as delicious as they are visually appealing.
{{image_2}}
Microwave Method
To melt the chocolate for your Frozen Banana Chocolate Sandwiches, the microwave is a convenient and effective option. Start by breaking your chocolate into small, uniform pieces and placing them in a microwave-safe bowl. Microwaving chocolate requires careful attention to avoid burning, as it can quickly go from melted to scorched.
1. Melting the Chocolate: Heat the chocolate in the microwave on medium power for 30 seconds at a time. After each interval, remove the bowl and stir the chocolate thoroughly. This stirring is critical as it helps distribute the heat evenly and ensures the chocolate melts smoothly without clumping.
2. Continuing the Process: Repeat this process—30 seconds in the microwave followed by stirring—until the chocolate is almost completely melted. It’s okay to have a few small lumps remaining; these will melt as you stir. This technique typically takes about 1.5 to 2 minutes, depending on your microwave’s wattage.
By the end of this step, you should have a beautifully melted chocolate mixture ready for dipping your banana sandwiches.
Dipping and Decorating the Sandwiches
Coating the Sandwiches
Once your chocolate is melted, it’s time to coat the banana sandwiches. This is where the fun begins! Follow these steps for the perfect chocolate coating:
1. Dipping Technique: Take one banana sandwich at a time and dip it into the melted chocolate. Use a fork or a skewer to ensure you get an even coating. Gently lift the sandwich out of the chocolate, allowing the excess chocolate to drip back into the bowl.
2. Managing Excess Chocolate: To avoid a thick layer of chocolate that can be cumbersome, tap the fork gently on the side of the bowl. This will help remove any excess chocolate and create a thinner, more appealing layer that sets nicely.
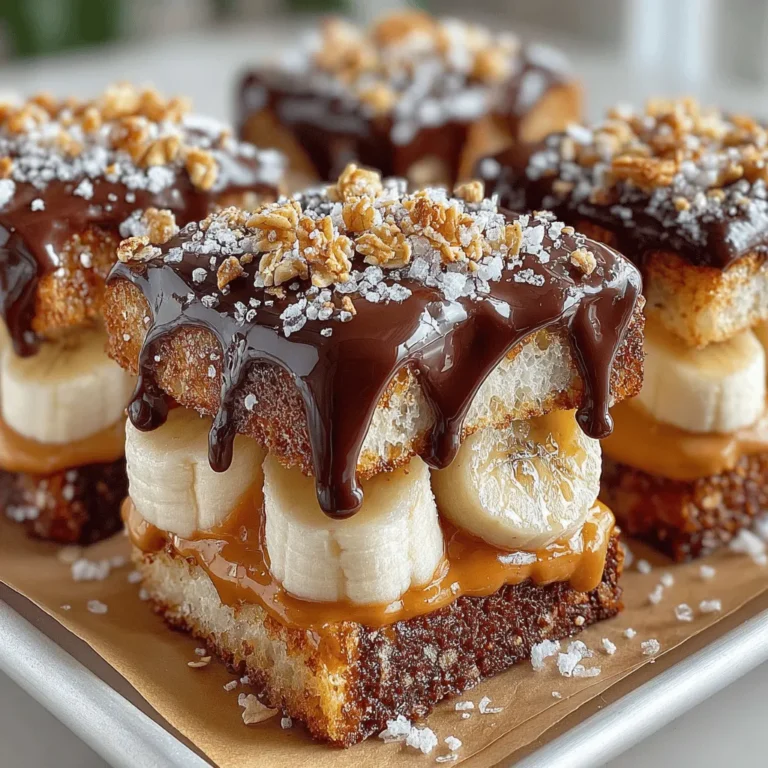
Adding Toppings
Enhancing your Frozen Banana Chocolate Sandwiches with toppings is a fantastic way to add flavor and texture. Here are some ideas:
1. Sea Salt: A light sprinkle of flaky sea salt over the chocolate coating can create a delightful contrast to the sweetness of the banana and chocolate.
2. Granola: For some crunch, add a few pieces of granola on top while the chocolate is still wet. This not only provides texture but also adds a delightful nutty flavor.
3. Crushed Nuts: Chopped almonds, walnuts, or hazelnuts are excellent options for adding a protein boost and additional crunch. Simply sprinkle them on top immediately after dipping.
4. Coconut Flakes: Toasted coconut flakes can also be a great addition, bringing a tropical flair and chewiness to your sandwiches.
Final Freezing and Serving Suggestions
Setting the Chocolate
After you’ve coated the sandwiches in chocolate and added your desired toppings, it’s crucial to place them back in the freezer. This step allows the chocolate to harden properly, forming a satisfying shell around each sandwich.
1. Freezing Time: Lay the dipped sandwiches on a parchment-lined baking sheet, ensuring they are spaced apart to avoid sticking together. Freeze them for at least 30 minutes or until the chocolate is firm to the touch.
Serving Suggestions
Presentation plays a vital role in the enjoyment of your homemade treats. Here are some creative ways to serve your Frozen Banana Chocolate Sandwiches:
1. Colorful Plates: Use vibrant plates or serving trays to display your sandwiches. The contrast between the dark chocolate and the bright bananas will make for an enticing presentation.
2. Garnishes: Consider garnishing your plate with fresh fruits like berries or mint leaves to elevate the visual appeal. This not only makes for a beautiful display but adds an extra layer of flavor.
3. Individual Wrapping: For a fun twist, wrap each sandwich in colorful parchment paper tied with twine. This makes for a delightful snack option that’s perfect for picnics or lunch boxes.
Nutritional Benefits of Frozen Banana Chocolate Sandwiches
These Frozen Banana Chocolate Sandwiches are not just delicious; they also offer numerous health benefits from their wholesome ingredients.
Balanced Snack
1. Nutrient-Rich Ingredients: Bananas are a great source of potassium, vitamin C, and fiber, making them a fantastic choice for a healthy snack. The nut butter adds healthy fats and protein, contributing to satiety and energy.
2. Natural Sweetness: The natural sweetness of bananas means you can enjoy a treat without relying on added sugars, making these sandwiches a healthier alternative to traditional desserts.
Satisfying Sweet Tooth
1. Indulgent Yet Healthy: The rich flavor of the melted chocolate provides a satisfying experience that can help curb sweet cravings. Coupled with the creamy nut butter, these sandwiches offer a perfect blend of flavors and textures.
2. Energy Boost: This treat can serve as a quick energy boost, ideal for a pre-workout snack or a midday pick-me-up. With a balanced combination of carbohydrates, healthy fats, and protein, they will keep you fueled and satisfied.
Variations and Customizations
One of the best aspects of Frozen Banana Chocolate Sandwiches is their versatility. You can easily adapt this recipe to suit your taste preferences or dietary needs.
Flavor Combinations
1. Nut Butters: Experiment with different types of nut butters like almond, cashew, or sunflower seed butter for unique flavors. Each nut butter imparts a distinct taste that can alter the overall flavor profile of your sandwiches.
2. Chocolate Types: Consider using dark chocolate for a richer flavor, or white chocolate for a sweeter twist. You can even try flavored chocolate, such as mint or orange-infused, to create exciting variations.
3. Toppings: Feel free to mix and match toppings based on your cravings. Try adding crushed pretzels for a sweet-salty treat or drizzling some honey or maple syrup over the top before serving for an extra touch of sweetness.
Dietary Adjustments
1. Vegan Options: To keep the recipe vegan, select dairy-free chocolate and ensure the nut butter you use is also vegan-friendly. This way, you can enjoy the same deliciousness without compromising dietary preferences.
2. Nut-Free Alternatives: If you have nut allergies, substitute the nut butter with sunflower seed butter or tahini. These options provide a similar creamy texture without the allergens.
Conclusion: Enjoying Your Homemade Frozen Treats
Making Frozen Banana Chocolate Sandwiches is not only a fun and creative kitchen project, but it also results in a deliciously satisfying treat. The combination of sweet bananas, creamy nut butter, and rich chocolate offers a delightful experience that can be enjoyed by everyone.
With their nutritional benefits and versatility, these sandwiches cater to a variety of tastes and dietary needs. Whether you choose to stick to the classic recipe or explore unique variations, the process of creating these treats will bring joy and satisfaction.
So, gather your ingredients, invite friends or family to join in, and enjoy experimenting with flavors and toppings. Dive into the delightful world of homemade frozen treats and savor every bite of your delicious creations!
