
Frozen Yogurt Apple Pie Sandwich Bars: A Refreshing Dessert Delight
As the temperatures rise and summer beckons, nothing quite hits the spot like a chilled dessert. Enter the Frozen Yogurt Apple Pie Sandwich Bars—a delightful fusion of creamy yogurt and the nostalgic flavors of classic apple pie. These bars offer a refreshing twist to a beloved dessert, combining the wholesome goodness of fresh apples with the rich creaminess of yogurt, making them an ideal treat for warm weather or social gatherings.
Imagine biting into a sweet yet tangy apple filling, sandwiched between layers of smooth frozen yogurt and a crunchy graham cracker crust. This recipe not only satisfies your sweet tooth but also provides a healthier alternative to traditional desserts, allowing you to enjoy a delicious indulgence without the guilt. Whether you’re hosting a summer barbecue, enjoying a picnic in the park, or simply looking for a cool treat after dinner, these frozen yogurt apple pie sandwich bars are sure to impress.
The Appeal of Frozen Yogurt Bars
Frozen yogurt bars have surged in popularity in recent years, and for good reason. They are incredibly versatile, allowing for a range of flavors and ingredients to suit any palate. Unlike ice cream, frozen yogurt typically contains less fat and can be made with healthier ingredients, making it a favored choice for those seeking a lighter dessert option. The creamy texture and refreshing taste are perfect for satisfying cravings, especially during the warmer months.
Combining the essence of apple pie—a dessert that evokes warmth and nostalgia—with the lightness of frozen yogurt creates a unique balance that appeals to both traditionalists and those looking for innovative flavors. The result is a dessert that is not only delicious but also visually appealing, making it a standout choice for any dessert table.
Understanding the Ingredients
To craft the perfect Frozen Yogurt Apple Pie Sandwich Bars, it’s crucial to understand the key ingredients that contribute to the flavor and texture of this dessert.
1. Fresh Apples: The star ingredient of this recipe, apples add natural sweetness and a delightful crunch. Choosing the right variety is essential; Granny Smith apples provide a tartness that balances the sweetness of the yogurt and sugar, while Honeycrisp apples offer a sweeter, juicier bite. Depending on your preference, you can mix these varieties to achieve a more complex flavor profile.
2. Greek Yogurt: This ingredient is a game-changer, providing a creamy texture and a healthy dose of protein. Greek yogurt is thicker than regular yogurt, giving the bars a satisfying richness without the heaviness of ice cream. Opting for plain Greek yogurt allows for better control of sweetness and flavor, but you can also use flavored varieties for added taste.
3. Graham Cracker Crust: The crust serves as a perfect base, offering a crunchy texture that contrasts beautifully with the creamy layers. The flavor of graham crackers adds a hint of sweetness and nuttiness, reminiscent of traditional pie crusts. You can easily customize the crust by adding spices or using different types of cookies.
4. Optional Toppings: To elevate your dessert, consider adding toppings like chopped nuts, shredded coconut, or a drizzle of caramel sauce. These toppings not only enhance the flavor but also add a textural element that makes each bite more enjoyable.
Crafting the Perfect Apple Layer
Creating the apple layer is where the magic begins. To achieve the ideal balance of flavors and texture, follow these steps meticulously:
1. Preparing the Apple Mixture: Start by peeling, coring, and dicing your chosen apples. The size of the apple pieces is important; aim for small, uniform chunks to ensure even cooking and distribution throughout the bars.
2. Cooking the Apples: In a medium saucepan over medium heat, combine the diced apples with a splash of lemon juice, a sprinkle of cinnamon, and a bit of brown sugar. The lemon juice not only prevents the apples from browning but also adds a bright acidity that enhances their flavor. The brown sugar adds depth and caramelization during cooking.
3. Cooking Time and Temperature: Allow the apples to cook down for about 10 minutes, stirring occasionally. You want them to soften but not completely disintegrate. Achieving the right texture is crucial; the apples should retain some bite to provide a satisfying crunch within the bars.
4. Thickening the Mixture: To help bind the apple filling, mix a tablespoon of cornstarch with a bit of water to create a slurry. Add this to the apple mixture during the last few minutes of cooking. This will help thicken the juices released by the apples, resulting in a cohesive filling that holds together well once frozen.
5. Cooling the Mixture: Once cooked, remove the saucepan from the heat and allow the apple mixture to cool completely before assembling the bars. This step is essential to prevent the yogurt layer from melting when combined.
Creating a Creamy Yogurt Layer
While the apple layer cools, it’s time to focus on the yogurt component of the bars. Here’s how to create a smooth, creamy layer that complements the apple filling perfectly:
1. Selecting the Right Yogurt: Choose a high-quality Greek yogurt for the best results. While plain yogurt provides versatility, flavored options—like vanilla or honey—can enhance the overall taste of the bars. Be mindful of the sweetness level, as flavored yogurts may require less added sweetener.
2. Sweetening the Yogurt: Depending on your yogurt choice, you may want to add a natural sweetener. Honey and maple syrup are excellent options that can enhance flavor without overpowering it. Start with a small amount, tasting as you go, to achieve your desired sweetness.
3. Mixing for Smoothness: To ensure a smooth consistency, whisk the yogurt and sweetener together until well combined. If you prefer a lighter texture, you can fold in a bit of whipped cream or whipped coconut cream to the yogurt mixture. This addition will give the yogurt layer a fluffy, airy quality that complements the dense apple layer beautifully.
Next Steps
With the apple layer prepared and the yogurt mixture ready, the next phase involves assembling the bars before freezing. This step will ensure that the flavors meld beautifully, resulting in a delightful dessert that captures the essence of apple pie in every bite. Keep an eye out for the next part of this recipe, where we’ll guide you through the assembly process and reveal some serving ideas to make your Frozen Yogurt Apple Pie Sandwich Bars truly unforgettable.
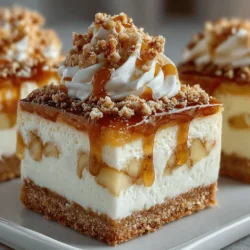
{{image_2}}
Assembling the Crust
To create the perfect foundation for your Frozen Yogurt Apple Pie Sandwich Bars, you’ll want to focus on preparing a graham cracker crust that boasts the right texture and flavor balance. This crust not only serves as a base but also enhances the overall eating experience with its crunchy yet crumbly nature.
Step-by-Step Guide on Preparing the Graham Cracker Crust
1. Gather Your Ingredients: You will need 1 ½ cups of graham cracker crumbs, ⅓ cup of sugar (or a sugar substitute for a healthier option), and ½ cup of melted coconut oil or unsalted butter.
2. Mix the Dry Ingredients: In a medium-sized bowl, combine the graham cracker crumbs and sugar. Stir them together until thoroughly mixed.
3. Incorporate the Melted Coconut Oil or Butter: Pour the melted coconut oil or butter into the dry ingredients. This fat is crucial as it binds the crumbs together while adding moisture and flavor.
4. Form the Crust Mixture: Use a fork or your hands to mix the ingredients, ensuring the crumbs are evenly coated with the oil or butter, resulting in a sandy texture.
5. Press the Mixture into the Pan: Take a 9×9 inch baking pan and firmly press the crust mixture into the bottom. Use the back of a measuring cup or your fingers to compact it well. This step is important for structural integrity; a well-pressed crust will hold together when cut into bars.
Importance of Texture
The texture of your graham cracker crust is vital. It should be crumbly yet firm enough to hold the layers together without crumbling when served. If the crust is too loose, consider adding a touch more melted coconut oil or butter to achieve the desired consistency.
Layering the Bars
With the crust ready, it’s time to layer the yogurt and apple filling. This step is crucial for achieving the harmonious blend of flavors, ensuring every bite delivers a delightful balance of creamy yogurt and sweet, spiced apple goodness.
Instructions for Assembling the Yogurt and Apple Layers
1. Prepare Your Yogurt Layer: In a bowl, mix 2 cups of your favorite yogurt (Greek yogurt is a great option for added creaminess) with ¼ cup of maple syrup or honey for sweetness. You may also add a teaspoon of vanilla extract for extra flavor.
2. Layer the Yogurt: Pour half of the yogurt mixture over the crust, spreading it evenly with a spatula to ensure a consistent layer.
3. Add the Apple Layer: Prepare your apple filling by combining 2 cups of diced apples (choose a mix of tart and sweet varieties for depth of flavor) with 1 teaspoon of cinnamon and 1 tablespoon of lemon juice. Spread this apple mixture evenly over the yogurt layer.
4. Finish with the Remaining Yogurt: Top the apple layer with the remaining yogurt mixture, smoothing it out to cover the apples completely.
Tips on Spreading the Layers
To achieve visually appealing bars, take your time when spreading each layer. Use a spatula to ensure the yogurt is smooth and evenly distributed. A small offset spatula works wonders for this task. The more even your layers are, the better the presentation will be when you cut the bars.
Importance of Chilling Time
After layering, cover the pan with plastic wrap and place it in the freezer. Allow the bars to freeze for at least 4-6 hours, or overnight if possible. This chilling time is essential for achieving the best texture; it allows the layers to set firmly, ensuring they hold together when cut.
Freezing and Serving the Bars
Once your bars have set in the freezer, it’s time to cut and serve them. Proper freezing and presentation are key to making your Frozen Yogurt Apple Pie Sandwich Bars a hit.
Detailed Instructions on How to Freeze the Bars
1. Check the Consistency: After the recommended chilling time, check that the bars are firm. They should feel solid to the touch.
2. Cut the Bars: Remove the bars from the freezer and let them sit at room temperature for about 5-10 minutes. This helps soften them slightly, making cutting easier. Use a sharp knife to slice them into squares or rectangles, depending on your preference.
3. Keep Them Frozen Until Serving: To maintain the quality of the bars, keep any that you’re not serving immediately in the freezer.
Suggestions for Cutting and Serving
For a beautiful presentation, consider serving the bars on a platter garnished with fresh apple slices or a sprinkle of cinnamon. You can also drizzle a bit of honey or maple syrup over the top for an extra touch of sweetness. For gatherings, serve them alongside a scoop of vanilla or cinnamon ice cream for a delightful dessert combination.
Discussion on Storage Options
To ensure your Frozen Yogurt Apple Pie Sandwich Bars remain fresh, store any leftovers in an airtight container in the freezer. They can last for up to two months. If you want to keep them individually portioned, consider wrapping each bar in plastic wrap or parchment paper before placing them in the container.
Nutritional Benefits of Frozen Yogurt Apple Pie Sandwich Bars
These Frozen Yogurt Apple Pie Sandwich Bars are not only delicious but also packed with nutritional benefits, making them a healthier alternative to traditional dessert options.
Analysis of the Health Benefits of Each Ingredient
– Yogurt: Rich in probiotics, yogurt supports digestive health and provides a good source of protein and calcium.
– Apples: Apples are high in fiber, which aids in digestion and helps to keep you full longer. They are also rich in antioxidants, promoting heart health.
– Graham Crackers: When made with whole grains, graham crackers provide a source of complex carbohydrates and fiber.
– Coconut Oil or Butter: While higher in fats, coconut oil has medium-chain triglycerides (MCTs) that can provide quick energy.
Comparison with Traditional Desserts
When compared to traditional apple pie, which can be laden with sugar and fats from pie crusts, these bars offer a lighter option that doesn’t compromise on flavor. A typical slice of apple pie may contain upwards of 300 calories and significant amounts of added sugars, while these bars can be made to contain fewer calories and natural sweeteners.
Caloric Breakdown and Nutritional Highlights
A serving (1 bar) of these Frozen Yogurt Apple Pie Sandwich Bars typically contains about 150-200 calories, depending on the ingredients used. They provide a good balance of macronutrients, including healthy fats from coconut oil, carbohydrates from the graham crackers and apples, and protein from the yogurt.
Conclusion
In summary, the Frozen Yogurt Apple Pie Sandwich Bars are a delightful treat that offers a perfect blend of flavors and textures. The creamy yogurt, crunchy crust, and sweet apple filling come together to create a dessert that is not only satisfying but also healthier than many traditional options.
The preparation is straightforward, making it accessible for bakers of all skill levels. These bars are an excellent choice for gatherings, picnics, or simply as a sweet ending to a meal.
We encourage you to try this recipe and share your experiences. Join the community of healthy dessert lovers by experimenting with your variations or sharing your favorite serving suggestions!