
Zesty Lime Paradise No-Bake Bars: A Refreshing Delight
No-bake desserts have gained immense popularity among home cooks and dessert enthusiasts alike, and for good reason. These delightful treats not only save time in the kitchen but also allow for a world of creativity without the constraints of baking. Among the myriad of no-bake recipes available, the Zesty Lime Paradise No-Bake Bars stand out as a refreshing and invigorating option. With their bright and tangy lime flavor, these bars are perfect for satisfying your sweet tooth while also offering a nutritious boost. Whether you’re preparing a snack for a busy day, a dessert for a gathering, or a healthy treat to enjoy at home, these no-bake bars fit the bill effortlessly.
The vibrant flavor profile of lime adds a refreshing twist to these bars, making them an ideal choice for warm weather or any time you crave something light and zesty. Beyond their delicious taste, limes are packed with health benefits. Rich in vitamin C, they contribute to immune health, skin vitality, and overall well-being. The tartness of lime combined with the sweetness of a natural sweetener creates a perfect balance that elevates these bars from simple snacks to gourmet treats.
Understanding the Ingredients
Crafting the perfect Zesty Lime Paradise No-Bake Bars starts with understanding the ingredients that make this recipe not only delicious but also nutritious. Let’s delve into the primary components that come together to create these delightful bars:
– Rolled Oats: A staple in many no-bake recipes, rolled oats provide a wholesome base. They are an excellent source of fiber, which aids in digestion and helps maintain a healthy weight. Additionally, oats are packed with whole grains, making them a heart-healthy choice.
– Almond Flour: This gluten-free alternative to traditional flour is a fantastic ingredient in no-bake bars. Almond flour is rich in healthy fats, protein, and vitamin E, offering a nutty flavor that enhances the overall taste while contributing to a satisfying texture.
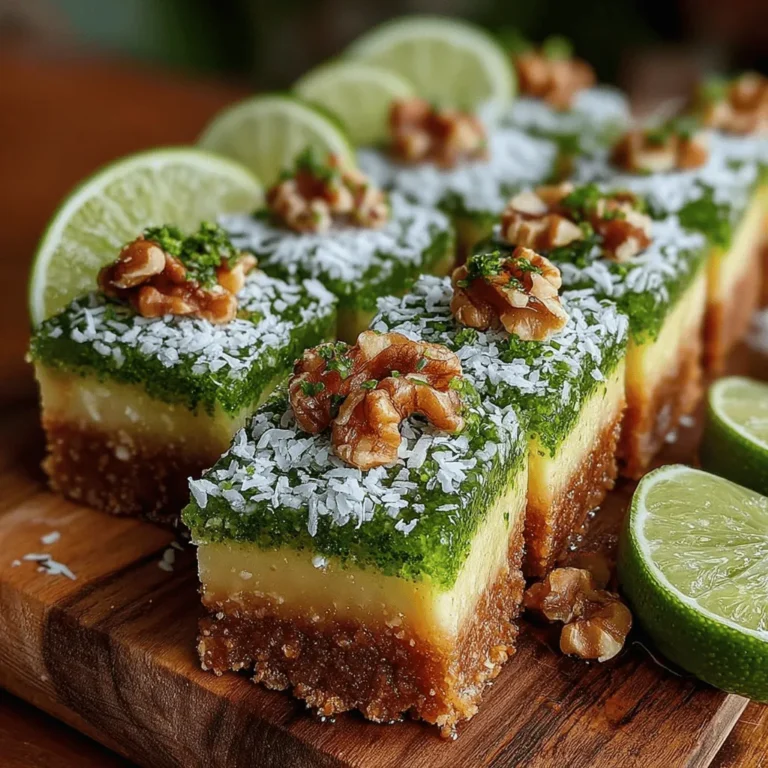
– Unsweetened Shredded Coconut: Adding a tropical flair, unsweetened shredded coconut is a source of healthy fats and dietary fiber. It not only complements the lime flavor but also contributes to the chewy texture of the bars.
– Maple Syrup/Agave Nectar: For a touch of sweetness, natural sweeteners like maple syrup or agave nectar can be used. These alternatives to refined sugar provide sweetness without the sugar crash and offer trace minerals, making them healthier options.
– Coconut Oil: This versatile oil is packed with medium-chain triglycerides (MCTs), which are beneficial fats that can provide quick energy and support metabolism. Coconut oil also helps bind the ingredients together, ensuring the bars hold their shape.
– Lime Juice and Zest: The star ingredients of this recipe, lime juice and zest, not only provide a burst of flavor but are also rich in vitamin C and antioxidants. The zest contains essential oils that enhance the lime flavor, making each bite a zesty experience.
– Pure Vanilla Extract: To elevate the flavor profile, pure vanilla extract is added. It brings depth and warmth to the bars, balancing the tartness of the lime perfectly.
– Optional Nuts: For those who enjoy a crunchy texture, adding chopped nuts such as almonds or walnuts can enhance the bars even further. Nuts provide healthy proteins, healthy fats, and a satisfying crunch.
With these wholesome ingredients, you’re not just creating a delicious treat; you’re also preparing something that can nourish your body and tantalize your taste buds.
Step-by-Step Preparation Guide
Now that we have a clear understanding of the ingredients, let’s dive into the step-by-step preparation guide for making the Zesty Lime Paradise No-Bake Bars. This process is straightforward and requires minimal equipment, making it accessible for all skill levels.
1. Preparing the Base: Mixing Dry Ingredients
Start by gathering all your dry ingredients. In a large mixing bowl, combine the rolled oats, almond flour, and unsweetened shredded coconut. It’s essential to mix these dry ingredients thoroughly to ensure an even distribution of flavors and textures throughout the bars. Use a spatula or wooden spoon to break up any clumps and to ensure that the oats, flour, and coconut are well combined.
2. Combining Wet Ingredients: Ensuring a Smooth Consistency
In a separate bowl, prepare your wet ingredients. Start by measuring out the coconut oil and gently melting it if it’s solid. This can be done in the microwave in short bursts or on the stovetop. Once melted, add the maple syrup or agave nectar, followed by the fresh lime juice and lime zest. A splash of pure vanilla extract should also be included at this stage.
Using a whisk or fork, blend these ingredients until they form a smooth mixture. It’s crucial to ensure that the coconut oil is fully incorporated, as this will help bind the bars together once they’re combined with the dry ingredients.
Once your wet mixture is ready, you’ll be prepared to combine it with your dry ingredients, creating the base of the Zesty Lime Paradise No-Bake Bars.
Stay tuned for the next part of this article, where we will explore the final steps in the preparation process, including how to set the bars and add any optional nuts for extra crunch. With just a few more steps, you’ll be on your way to enjoying these delightful no-bake treats!
{{image_2}}
Mixing Everything Together
To create the perfect texture for your Zesty Lime Paradise No-Bake Bars, it’s essential to mix all the ingredients thoroughly. Start by adding the crust ingredients—typically a blend of nuts, oats, and a sweetener like maple syrup—into your food processor. Pulse until the mixture resembles coarse crumbs, ensuring that the nuts are finely chopped. Then, gradually add the wet ingredients, which include coconut oil and lime juice, while processing. This method allows for even distribution of flavors and ensures that every bite is zesty and delicious.
For a smoother bar, blend the mixture longer, but be careful not to over-process, as this can lead to a greasy texture. The goal is to achieve a sticky consistency that will hold together when pressed into the pan. If the mixture feels too dry, a splash of water or additional lime juice can help achieve the perfect consistency.
Lining the Pan
Before pressing your mixture into the pan, take a moment to line it with parchment paper. This simple step offers several advantages. First, it prevents the bars from sticking, making removal a breeze once they are set. Second, it helps maintain the shape of the bars, allowing for cleaner, more professional-looking slices. Cut the parchment paper so that it extends over the edges of the pan, creating “handles” for easy lifting after chilling.
Using parchment paper also aids in easy cleanup, saving you time and effort in the kitchen. Plus, it keeps the bars intact and prevents any crumbling, ensuring that you can serve them with pride.
Pressing into the Pan
Once your mixture is well-combined and your pan is lined, it’s time to press the mixture firmly into the pan. This step is crucial for achieving the right texture and ensuring that your bars hold their shape when sliced. Use a flat-bottomed measuring cup or your hands to press the mixture evenly and firmly into the corners of the pan. The more compact the mixture, the better it will hold together, so don’t be shy about applying some pressure.
Make sure to create an even layer, as an uneven base can lead to bars that crumble or break apart when you cut them. After pressing, you can smooth the top with a spatula for a polished finish.
Chilling and Setting
Now that your mixture is pressed into the pan, it’s time to chill it in the refrigerator. Chilling is essential for allowing the bars to firm up properly. The cooling process helps the fats in the coconut oil solidify, which will bind the bars together and give them a desirable texture. Leave the bars to chill for at least 2 to 3 hours, or until they are set.
During this time, the flavors will meld, and the bars will become easier to slice. If you’re in a hurry, you can speed up the process by placing the pan in the freezer for about 30-45 minutes. Just be mindful not to forget them, as freezing for too long can lead to a hard texture.
Slicing and Serving
Once your bars are set, it’s time to slice and serve! Using the overhanging parchment paper, gently lift the bars out of the pan and place them on a cutting board. Use a sharp knife to cut them into squares or rectangles, depending on your preference. For clean slices, wipe the knife with a damp cloth between cuts.
When serving, presentation is key! Arrange the bars on a colorful platter, and consider garnishing them with lime zest, shredded coconut, or a sprinkle of crushed nuts for added visual appeal. These bars pair beautifully with a refreshing herbal tea, a smoothie, or a side of fresh fruit, making them a versatile treat for any occasion.
Nutritional Information
These Zesty Lime Paradise No-Bake Bars are not only delicious but also packed with nutrients. Each bar contains approximately 150 calories, with around 8 grams of healthy fats, 15 grams of carbs, and 3 grams of protein. These bars are a great source of energy, making them an excellent snack choice for those looking to maintain balanced nutrition throughout the day.
Incorporating these bars into your diet can provide a healthy alternative to traditional snacks, as they are made from whole, plant-based ingredients without refined sugars. They offer a satisfying treat that can help curb sweet cravings while keeping you on track with your health goals.
Creative Presentation Ideas
When it comes to serving your Zesty Lime Paradise No-Bake Bars, creativity can elevate the experience. Consider presenting them on a vibrant platter with fresh lime wedges and mint leaves for a refreshing touch. You can also drizzle a simple glaze made from lime juice and powdered sugar over the bars for an extra layer of sweetness and visual appeal.
For pairing ideas, these bars complement a variety of beverages. Serve them alongside a chilled herbal tea or a refreshing smoothie for a perfect afternoon snack. Fresh fruits like berries or slices of tropical fruits can also enhance the dish, providing contrasting flavors and textures.
If you want to adapt the recipe for seasonal variations, consider incorporating different fruits like strawberries, peaches, or even a berry blend for a unique twist. Adjust the lime juice accordingly to balance the flavors, creating a new favorite each season.
Storage Recommendations
To keep your Zesty Lime Paradise No-Bake Bars fresh, proper storage is essential. These bars can be stored in an airtight container in the refrigerator for up to one week. If you want to enjoy them for a longer period, consider freezing them. Wrapped tightly in plastic wrap and placed in a freezer-safe container, these bars can last for up to three months.
When you’re ready to enjoy a frozen bar, simply remove it from the freezer and let it thaw in the refrigerator for about 30 minutes before serving. This method ensures you always have a healthy snack on hand, ready to satisfy your cravings.
Conclusion
In summary, the Zesty Lime Paradise No-Bake Bars are a delightful and nourishing treat that embodies simplicity and healthfulness. With their refreshing lime flavor and satisfying texture, they are perfect for snacking any time of the day. Not only do these bars provide a quick energy boost, but they also allow you to indulge in a guilt-free dessert.
We encourage you to try this recipe and experience the joy of creating delicious, healthy snacks at home. With a little creativity and the right ingredients, you can whip up a batch of these bars that will impress your family and friends while keeping your health goals in check. Enjoy the refreshing taste of the Zesty Lime Paradise No-Bake Bars, and celebrate the pleasure of healthy eating!
